Last edited on 2025-01-22
Automatic Capture of NOAA Satellite Images
Background Information
The National Oceanic and Atmospheric Administration (NOAA) owns and operates a number of satellites in orbit around earth. These satellites serve a number of different purposes, ranging from weather monitoring and prediction to helping search and rescue teams locate distress signals from emergency beacons. A group of these satellites known as Polar Operational Environmental Satellites (POES) remain in a low polar orbit — that is, their orbit goes north-south over the poles. This allows the satellites to get a complete view of earth every day as earth rotates underneath them. Though several of these satellites were launched between the 1980s and early 2000s, only three remain operational. The interesting thing about these satellites is that they broadcast a few signals that are free to use if you can receive them. One such signal is the High Resolution Picture Transmission (HRPT) which contains high-resolution images (obviously) in infrared, near-infrared, and visible spectra. It also contains some non-image data from other instruments on the spacecraft. Sounds super cool, right? Well, the satellites broadcast that data at frequencies 1698, 1707, and 1702.5 MHz and use a bandwidth of 3 MHz. I am currently unaware of a super cheap or easy way to receive signals at those frequencies and that bandwidth. For reference, broadcast FM radio stations in the USA are each allocated 200 kHz bandwidth, which is why the frequencies are spaced at least 0.2MHz apart. Ever notice how all FM radio stations end in .1, .3, .5, .7, or .9? At 3 MHz, the HRPT signal spans 15 FM radio stations worth of bandwidth — basically, that's huge and difficult to receive on cheap equipment. There is, however, another option. The NOAA POES satellites also broadcast an Automatic Picture Transmission (APT) signal. APT is a proprietary slow scan TV signal developed for weather satellites in the 1960s. The APT signal uses only about 34 kHz bandwidth to deliver low-resolution images in real time over an FM signal. The bandwidth is narrow enough to easily be received with cheap equipment.
Remember how I said only three POES satellites remain operational? It's time to meet NOAA-15, NOAA-18, and NOAA-19, which at the time of writing all currently have functioning APT at 137.62, 137.9125, and 137.1 MHz respectively. This might not last forever, though. NOAA-15's signals have had several issues in recent years and all three satellites are currently operating well past their designed lifespan. Their current status should be able to be seen here.
So how do I receive these signals exactly? I'm using an rtl-sdr device. You can read all about what that is and how it works here. Basically, there are these chips that were mass-produced for DVB-T TV tuners, which some very smart people realized could be modified to function as a wideband RX-only software defined radio (SDR). This has since become quite popular and many people have started selling boards using these chips for the sole purpose of SDR. The gist is, you can buy a cheap (<$40) USB dongle that, when plugged into your computer and used with appropriate software, can receive all sorts of radio signals from ~24-1766 MHz. As you can see, the NOAA APT radio signals at ~137 MHz fall easily within that range. The dongle I bought can be found here, although if you shop around on eBay or Amazon you will probably find even cheaper dongles that perform similarly. If you want to mess around with the dongle and see the kinds of things you can listen to (including broadcast radio) I recommend using a piece of software like Gqrx.
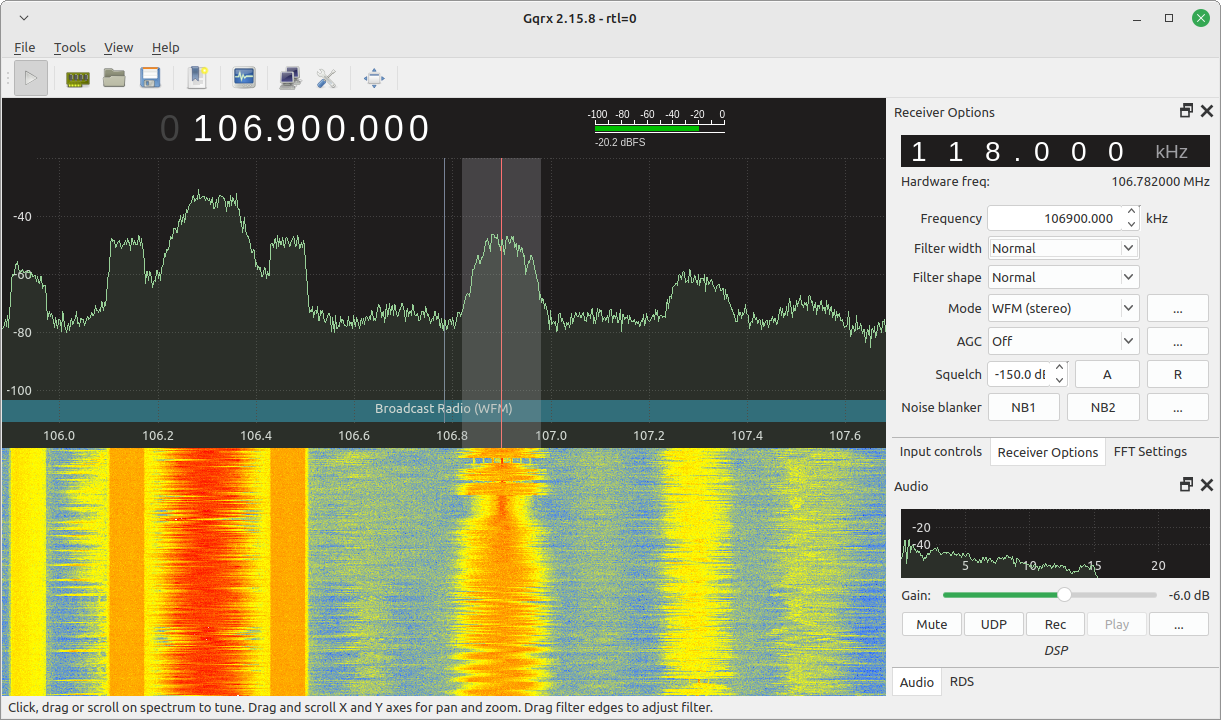
The signals picked up by the dongle are just raw radio signals, but Gqrx will let you tune the dongle to whatever frequency you want, and it can do demodulation for AM and FM signals. Gqrx is not available for Windows. However, I've heard of a program called SDR# which is supposed to be similar.
The kinds of signals you will be able to pick up depend in large part on the type of antenna used. The signals from the NOAA satellites are circularly polarized, and there is some debate over the best kind of antenna to use. Generally, a Quadrifilar Helicoidal (QFH) antenna is recommended and can be built with some PVC pipe and some copper tubing or wire. I went with a much easier option and used the V dipole antenna that came with my rtl-sdr dongle.
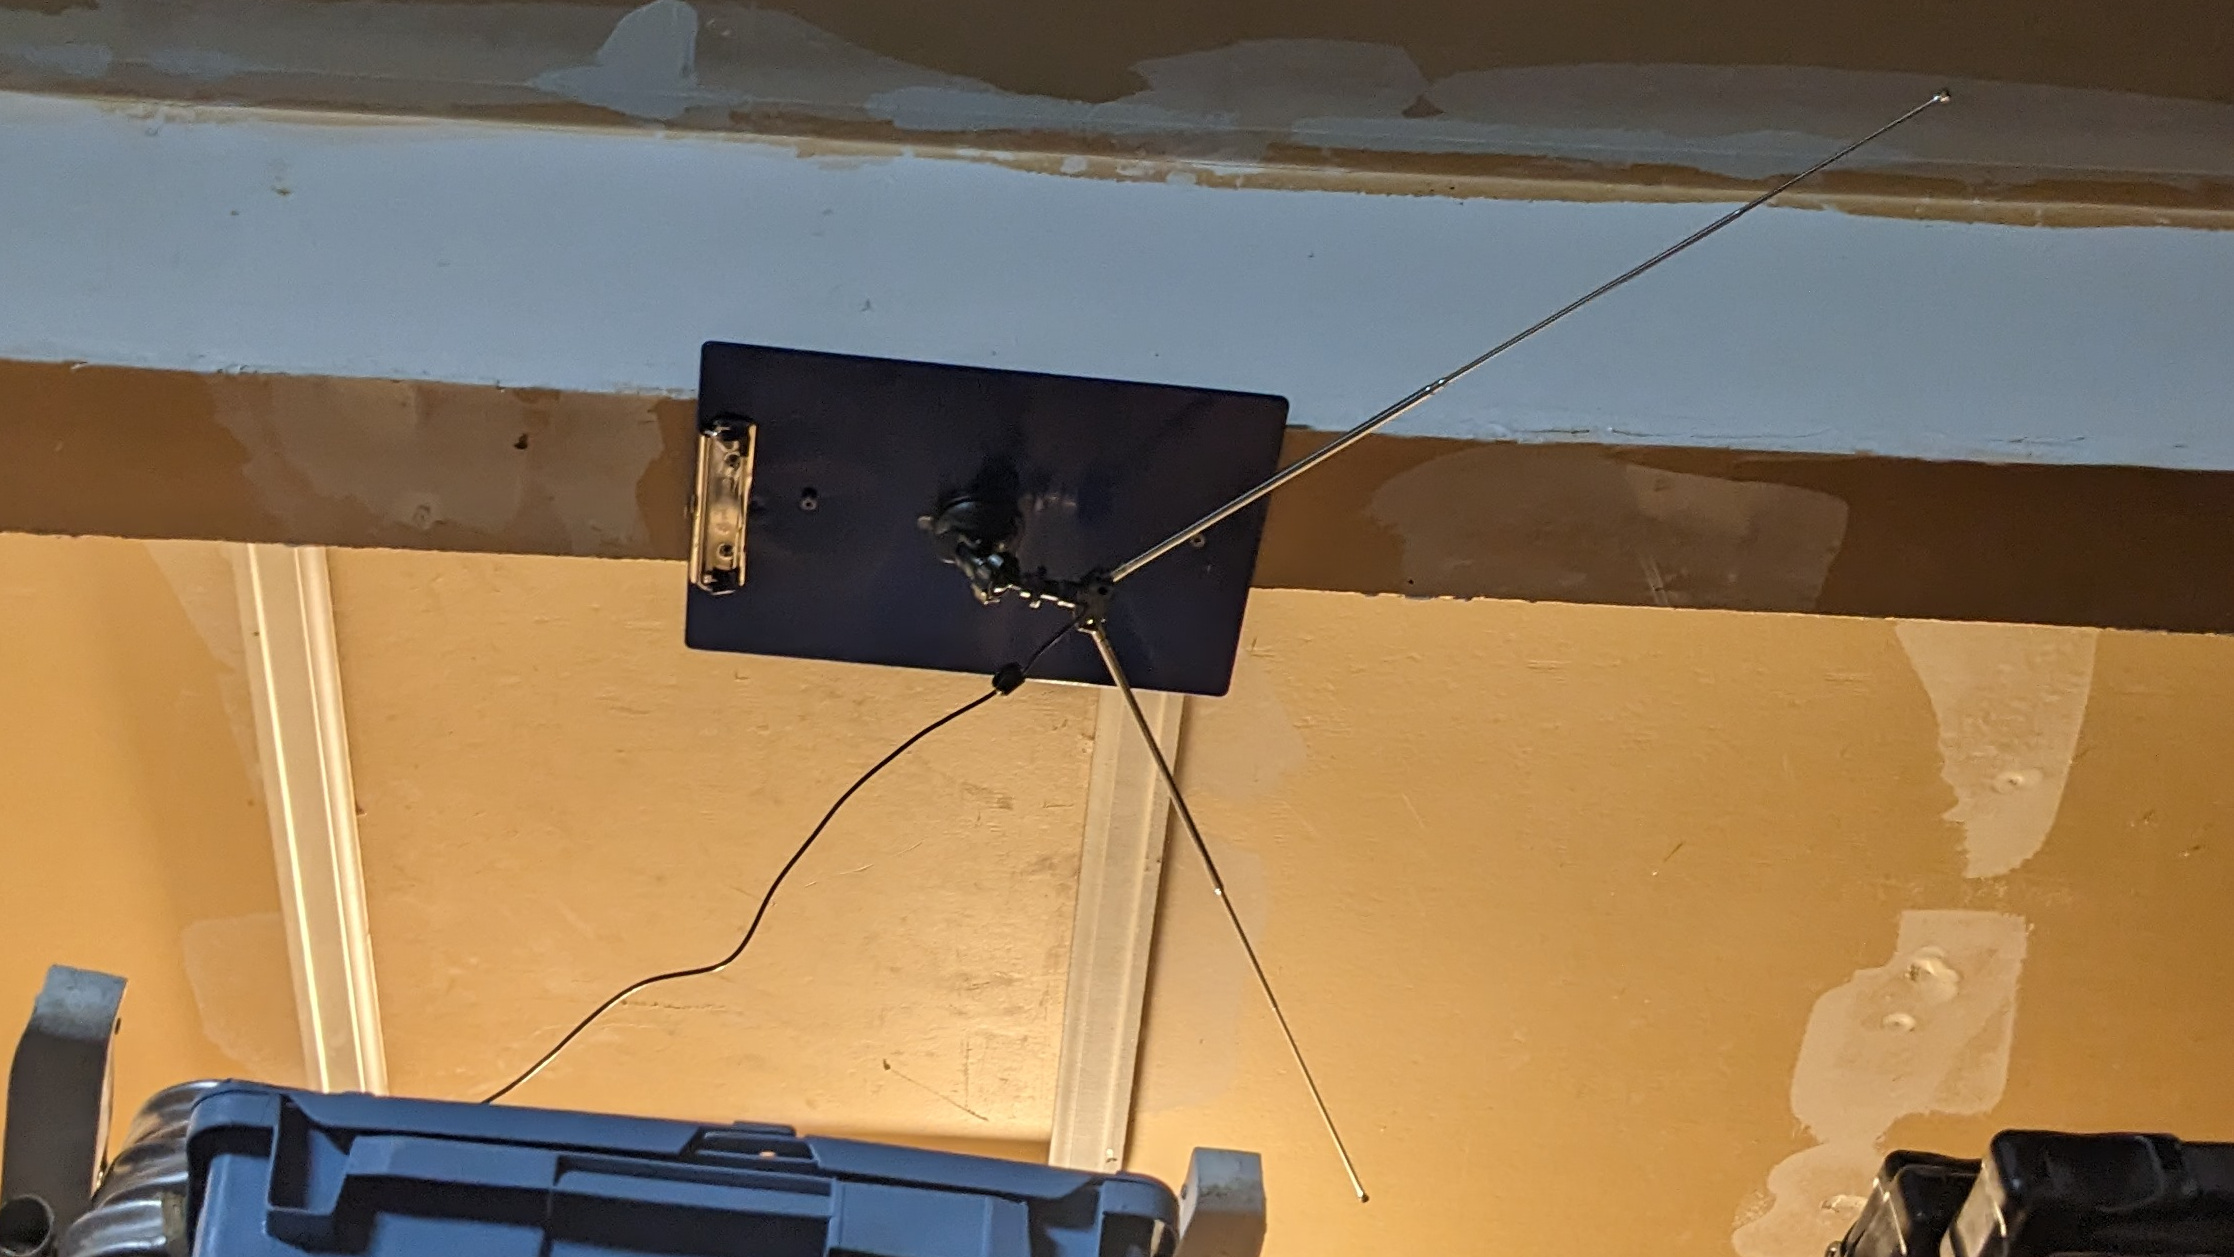
It works well enough for me, and some people say they get even better reception with the dipole because it picks up less interference from terrestrial signals. I set it up according to the dimensions found here. Basically, it's two conductors approximately 21 inches long and 120 degrees apart. Lay it horizontally and face the opening of the V either to the north or the south.
Automating Capture
So with all of that background information out of the way, let's learn how to capture APT images automatically using an rtl-sdr dongle while the satellites are passing overhead. I mostly based my setup on this tutorial; however, I made a number of changes to improve the process and used noaa-apt instead of wxtoimg. I am using a computer running Linux Mint and I make heavy use of Linux software, numerous changes would have to be made to accomplish a similar setup on Windows, although I suspect it's possible. By the way, Linux Mint is totally free and this could be a great project for an old computer. ;)
Software Required
To install all the needed software from apt (the package manager, not the Automatic Picture Transmission) use the following command.
sudo apt install rtl-sdr sox at python3 wget libncurses-dev libpthread-stubs0-dev libasound2-dev
The individual pieces of software, including the commands to install them individually, are listed below.
- predict — install manually (see below) — We will use this program to determine when the satellites will be passing overhead.
- noaa-apt — install manually (see below) — This program will decode our radio recordings into the final image.
- rtl-sdr —
sudo apt install rtl-sdr— This contains the drivers and a few command-line programs for the rtl-sdr dongle. - sox —
sudo apt install sox— This is an audio toolkit that we will use to get a WAV file in the appropriate format to be decoded. - at —
sudo apt install at— This is a command scheduler we will use to receive data at the right times. - python3 —
sudo apt install python3— This is likely already installed, but it is needed for my script that resolves conflicting satellite passes. - wget —
sudo apt install wget— This is also likely already installed; it will be used to download TLEs to determine satellite orbits.
The following are dependencies needed to install predict
- ncurses library —
sudo apt install libncurses-dev - pthread development headers —
sudo apt install libpthread-stubs0-dev - Advanced Linux Sound Architecture (ALSA) library —
sudo apt install libasound2-dev
Some software is not in the Linux Mint repositories and will have to be installed manually.
Installing predict
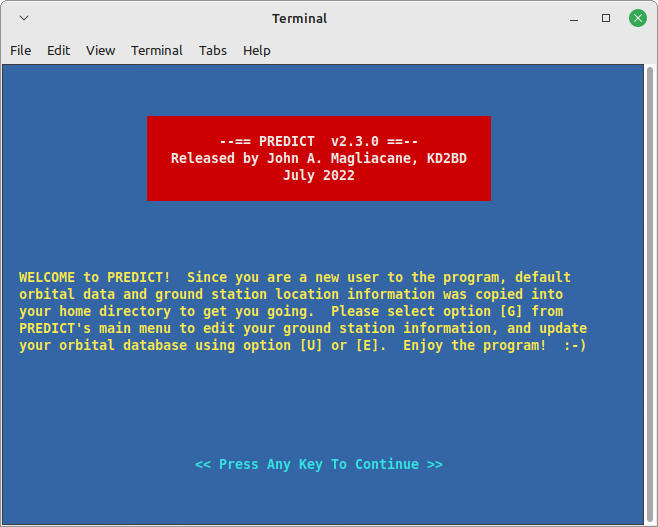
predict is a critical program for making this work, but unfortunately, it is no longer available in the Linux Mint software repositories. This means we will have to build it from source, but don't worry, it's super easy. First, make sure you have the dependencies required to build predict, the commands are listed above. On Linux Mint you need libncurses-dev, libpthread-stubs0-dev, and libasound2-dev. Then, go to the predict website, scroll down to where it says, "Download PREDICT," and click "PREDICT Version x.x.x for Linux." Alternatively, you can download the version I used directly from this link. Extract the tar file into its own folder by right-clicking it and clicking "Extract Here" or similar, depending on your desktop environment. Using a terminal, navigate to the folder it was extracted to. For example: cd /home/USERNAME/Downloads/predict-2.3.0. Then simply run sudo ./configure and it should compile and install predict automatically.
Once installed, you will have to run predict once to configure your location. Simply type predict in the terminal. You should be greeted with a welcome screen followed by a screen where you can set your location.
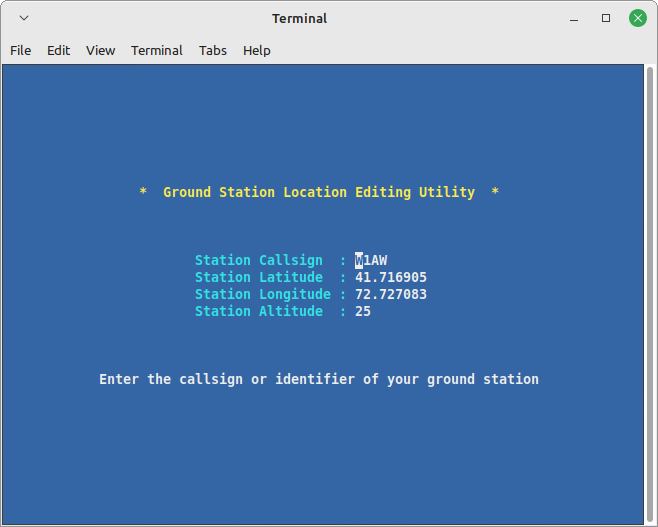
You will need your latitude and longitude; they can be easily obtained from Google Maps by right-clicking your location. Note that Google Maps uses positive values for North and positive values for East, and predict uses positive values for North but it uses positive values for West. This means you will likely have to adjust your longitude accordingly.
Installing noaa-apt
This is the program that will decode our recordings into images. Go to the download page on the noaa-apt website and follow the instructions for "Debian-based distros (Ubuntu, Linux Mint, etc.)." You should see a link labeled "GNU/Linux x86_64 .deb package." Alternatively, if you know what you are doing, it may be easier to find the build you need from the noaa-apt GitHub Releases page. On GitHub you will find builds for ARM processors, which is useful if you are using a Raspberry Pi computer, for example.
Once you have noaa-apt installed, you might want to test it by running noaa-apt --version from the terminal. If you see
noaa-apt image decoder version 1.4.0
You have the latest version available
or similar output, then the installation is successful, and you are done installing software for this project. :)
Making it Happen
The actual automation consists of 6 files.
There are 3 bash scripts.
- schedule_all.sh <-- Will be run once per day to schedule all passes
- schedule_satellite.sh <-- This script schedules all the passes on the current day for a given satellite (this is run from schedule_all.sh)
- receive_data.sh <-- This is the script that will be scheduled to run for a pass
There is 1 python script.
- handle_conflicts.py <-- If there are multiple passes at the same time, this script will try to keep only the one that reaches the highest elevation
There are 2 systemd unit files.
- schedule_satellites.service <-- A simple systemd service to run the schedule_all.sh script
- schedule_satellites.timer <-- A timer that runs schedule_satellites.service every day around midnight
You can find all the completed files needed for this project on my GitHub, or you can follow along below.
Create the Folder to Store the Scripts
First, make a folder to hold all these files. I would recommend using the /opt/ directory, as it was intended for optional extra software and is a great place to put random projects.
sudo mkdir /opt/schedule_satellites
I also recommend taking ownership of that folder, so you don't have to use sudo while making all the files.
sudo chown USERNAME /opt/schedule_satellites
Replace USERNAME with your username.
Create schedule_all.sh
Then, using your favorite text editor, create a new file in /opt/schedule_satellites/ called schedule_all.sh
and put the following code into the file:
#!/bin/bash

#Change directory to script directory
dir=$(cd -P -- "$(dirname -- "${BASH_SOURCE[0]}")" && pwd -P)
cd "$dir"

#Make output directories if they don't exist
[ -d images ] || mkdir images
[ -d tles ] || mkdir tles
[ -d audio ] || mkdir audio

#Update TLEs
wget -q https://www.celestrak.com/NORAD/elements/weather.txt -O weather.txt
grep "NOAA 15" weather.txt -A 2 > noaa.tle
grep "NOAA 18" weather.txt -A 2 >> noaa.tle
grep "NOAA 19" weather.txt -A 2 >> noaa.tle
[ -e "weather.txt" ] && rm weather.txt

#Remove data from previously scheduled jobs
[ -e "queued_jobs" ] && rm queued_jobs

#Schedule Satellite Passes for the day
./schedule_satellite.sh "NOAA 19" 137.1
./schedule_satellite.sh "NOAA 18" 137.9125
./schedule_satellite.sh "NOAA 15" 137.62

#Handle conflicts
/usr/bin/python3 handle_conflicts.py
This script doesn't have anything that needs to be customized. I will talk a bit about each part of the script and the differences from the tutorial I based this off of. First, all my scripts include this:
#Change directory to script directory
dir=$(cd -P -- "$(dirname -- "${BASH_SOURCE[0]}")" && pwd -P)
cd "$dir"
That just ensures that that working directory is the same directory the script resides in, no matter how the script is called. This allows me to use relative paths like ./schedule_satellite.sh instead of absolute paths like /opt/schedule_satellites/schedule_satellite.sh.
Next, output folders are created if they don't already exist. My scripts save the generated image, the Two Line Element (TLE) data used, and the raw recorded audio received during a capture.
#Make output directories if they don't exist
[ -d images ] || mkdir images
[ -d tles ] || mkdir tles
[ -d audio ] || mkdir audio
The next part downloads the latest TLEs from celestrak to ensure predict knows the satellites' current orbits. It pieces out the orbital data for NOAA-15, NOAA-18, and NOAA-19 and saves them in a file called noaa.tle. Finally, it removes the raw file it downloaded from celestrak.
#Update TLEs
wget -q https://www.celestrak.com/NORAD/elements/weather.txt -O weather.txt
grep "NOAA 15" weather.txt -A 2 > noaa.tle
grep "NOAA 18" weather.txt -A 2 >> noaa.tle
grep "NOAA 19" weather.txt -A 2 >> noaa.tle
[ -e "weather.txt" ] && rm weather.txt
Then, old data from the last set of passes is removed if it exists.
#Remove data from previously scheduled jobs
[ -e "queued_jobs" ] && rm queued_jobs
All passes for the satellites are scheduled for the day by running the schedule_satellite.sh script we will make next for each satellite.
#Schedule Satellite Passes for the day
./schedule_satellite.sh "NOAA 19" 137.1
./schedule_satellite.sh "NOAA 18" 137.9125
./schedule_satellite.sh "NOAA 15" 137.62
Finally, my handle_conflicts.py script is called to try and make sure only the best passes are recorded if there are any conflicts.
#Handle conflicts
/usr/bin/python3 handle_conflicts.py
Create schedule_satellite.sh
The next script we have to make will schedule all passes for a specific satellite. Again, using your favorite text editor create a new file in /opt/schedule_satellites/ called schedule_satellite.sh and put the following code:
#!/bin/bash

#Variables
readonly min_elevation=25            #Satellites that don't reach this elevation will be ignored
readonly record_above_elevation=5    #Set to 0 to record entire pass (NOTE: values above 0 will not be exact)

#Change directory to script directory
dir=$(cd -P -- "$(dirname -- "${BASH_SOURCE[0]}")" && pwd -P)
cd "$dir"

readonly satellite_name=$1
readonly frequency=$2
readonly tle_filename=`pwd -P`/noaa.tle
readonly receive_data_command=`pwd -P`/receive_data.sh

PREDICTION_START=`predict -t noaa.tle -p "${satellite_name}" | awk -v elev="$record_above_elevation" '{if($5>=elev){print; exit}}'`
PREDICTION_END=`predict -t noaa.tle -p "${satellite_name}" | tac | awk -v elev="$record_above_elevation" '{if($5>=elev){print; exit}}'`
TRUE_PREDICTION_END=`predict -t noaa.tle -p "${satellite_name}" | tail -n1`
MAX_ELEV=`predict -t noaa.tle -p "${satellite_name}" | awk -v max=0 '{if($5>max){max=$5}}END{print max}'`


end_timestamp=`echo ${PREDICTION_END} | cut -d " " -f 1`
true_end_timestamp=`echo ${TRUE_PREDICTION_END} | cut -d " " -f 1`

while [ "`date --date=\"@${true_end_timestamp}\" +%D`" == "`date +%D`" ]
do
    start_timestamp=`echo ${PREDICTION_START} | cut -d " " -f 1`
    capture_duration=`expr ${end_timestamp} - ${start_timestamp}`

    if [ $MAX_ELEV -ge $min_elevation  ]
    then
        date_string=`TZ=UTC date --date="@${start_timestamp}"`
        local_date_string=`date --date="@${start_timestamp}" "+%H:%M %D"`
        OUTDATE=`TZ=UTC date --date="@${start_timestamp}" +%Y%m%d_%H%M%S`
        filename_base="${OUTDATE}-${1//" "}"
        echo "Scheduling ${satellite_name} at ${date_string}"
        echo "Local Time:    ${local_date_string}"
        echo "Max Elevation: ${MAX_ELEV}"
        echo "Filename base: ${filename_base}"

        prev_queue=`atq`
        echo "/bin/bash ${receive_data_command} \"${satellite_name}\" \"${frequency}\" \"${filename_base}\" \"${tle_filename}\" \"${start_timestamp}\" \"${capture_duration}\"" | at -M ${local_date_string}
        new_queue=`atq`
        atid=`diff <(echo "${prev_queue}") <(echo "${new_queue}") | tail -n1 | cut -d " " -f 2 | cut -f 1`
        echo "${atid} ${satellite_name//" "} ${start_timestamp} ${end_timestamp} ${MAX_ELEV}" >> queued_jobs

        echo ""
    fi

    next_predict=`expr $true_end_timestamp + 60`
    PREDICTION_START=`predict -t noaa.tle -p "${satellite_name}" ${next_predict} | awk -v elev="$record_above_elevation" '{if($5>=elev){print; exit}}'`
    PREDICTION_END=`predict -t noaa.tle -p "${satellite_name}" ${next_predict} | tac | awk -v elev="$record_above_elevation" '{if($5>=elev){print; exit}}'`
    TRUE_PREDICTION_END=`predict -t noaa.tle -p "${satellite_name}" ${next_predict} | tail -n1`
    MAX_ELEV=`predict -t noaa.tle -p "${satellite_name}" ${next_predict} | awk -v max=0 '{if($5>max){max=$5}}END{print max}'`

    end_timestamp=`echo ${PREDICTION_END} | cut -d " " -f 1`
    true_end_timestamp=`echo ${TRUE_PREDICTION_END} | cut -d " " -f 1`
done
This script ended up being fairly complicated, so I'm not going to go through each part of it. Basically, it loops through each pass for the given satellite and schedules a command to run at the start of each pass if it meets some criteria. Compared to the script from the tutorial, there are many changes. I fixed some issues with the syntax provided to the date command, which gave incorrect results in some places.
I also added some variables you can change to your liking:
#Variables
readonly min_elevation=25            #Satellites that don't reach this elevation will be ignored
readonly record_above_elevation=5    #Set to 0 to record entire pass (NOTE: values above 0 will not be exact)
Basically, min_elevation is the elevation a satellite must reach in degrees before it will be scheduled for a pass. Generally, the closer the satellite comes to being directly overhead (90 degrees) the better the image quality will be. record_above_elevation is also a value in degrees. The script will try to schedule the pass so it only starts recording after the satellite rises above the value you set for record_above_elevation, and stop recording after it falls below the value you set for record_above_elevation. As noted in the script record_above_elevation is far from exact and may end up missing large portions of the satellite pass. If you set it to 0 it will record for the entire pass from horizon to horizon.
The other major difference that I will talk about is here:
prev_queue=`atq`
echo "/bin/bash ${receive_data_command} \"${satellite_name}\" \"${frequency}\" \"${filename_base}\" \"${tle_filename}\" \"${start_timestamp}\" \"${capture_duration}\"" | at -M ${local_date_string}
new_queue=`atq`
atid=`diff <(echo "${prev_queue}") <(echo "${new_queue}") | tail -n1 | cut -d " " -f 2 | cut -f 1`
echo "${atid} ${satellite_name//" "} ${start_timestamp} ${end_timestamp} ${MAX_ELEV}" >> queued_jobs
This part of the script actually generates the command to be run by at. Unlike the script from the tutorial, this also saves some data to a file called queued_jobs, including the id of the scheduled command so it can be removed later from the handle_conflicts.py script.
Create receive_data.sh
The next script will record the radio signal from the rtl-sdr and process it. Create another new file in /opt/schedule_satellites/ called receive_data.sh and put in the following code:
#!/bin/bash

#Change directory to script directory
dir=$(cd -P -- "$(dirname -- "${BASH_SOURCE[0]}")" && pwd -P)
cd "$dir"

readonly satellite_name=$1
readonly frequency=$2
readonly filename_base=$3
readonly tle_file=$4
readonly start_time=$5
readonly capture_duration=$6

readonly delay=`date +%s - ${start_time}`

[ $delay -gt 0 ] && sleep ${delay}

timeout ${capture_duration} rtl_fm -f ${frequency}M -s 60k -g 48 -E deemp -F 9 - | sox -t raw -e signed-integer -b 16 -r 60k - -t wav "audio/${filename_base}.wav.inprogress" rate 11025

if [ -e "audio/${filename_base}.wav.inprogress" ]
then
    grep "${satellite_name}" ${tle_file} -A 2 > "tles/${filename_base}.tle"
    mv "audio/${filename_base}.wav.inprogress" "audio/${filename_base}.wav"
    readonly satellite_name_noaa_apt=`echo "${satellite_name// /_}" | tr "[:upper:]" "[:lower:]"`
    noaa-apt -R no -m yes -T "tles/${filename_base}.tle" -s "${satellite_name_noaa_apt}" -o "images/${filename_base}.png" "audio/${filename_base}.wav"
fi
This script uses rtl_fm (a program included in the rtl-sdr package) to record at the given frequency. The timeout command ensures the recording ends at the end of the pass. The data captured from rtl_fm is passed to sox to create the properly formatted WAV file and places it in the audio folder. The audio file has a .wav.inprogress extension while being recorded. After the recording is complete the .wav.inprogress extension is renamed to simply .wav, the TLE is placed in the tles folder, the image is generated using noaa-apt and placed in the images folder.
Create handle_conflicts.py
This script looks through the queued_data file created from the schedule_satellite.sh script. It will find overlapping satellite passes and try to remove the scheduled commands for the conflicting satellites that have a lower max elevation.
#!/usr/bin/env python3

import os

if os.path.exists("queued_jobs"):
    data = []
    to_remove = []
    print("Checking for conflicts ...")
    with open("queued_jobs", "r") as file:
        for line in file:
            info = line.split(" ")
            job_data = {
                'atid': info[0],
                'satellite_name': info[1],
                'start_time': info[2],
                'end_time': info[3],
                'max_elev': info[4]
            }
            data.append(job_data)
    for job in data:
        current_atid = job['atid']
        if current_atid in to_remove:
            continue
        current_start_time = job['start_time']
        for other_job in data:
            if other_job['atid'] != current_atid:
                if current_start_time >= other_job['start_time'] and current_start_time <= other_job['end_time'] and other_job['atid'] not in to_remove:
                    print("Conflict!")
                    if job['max_elev'] > other_job['max_elev']:
                        # remove other job
                        print("Will remove {} because max elevation is lower. ({} instead of {})".format(other_job['atid'], other_job['max_elev'].rstrip(), job['max_elev'].rstrip()))
                        to_remove.append(other_job['atid'])
                    else:
                        # remove job
                        print("Will remove {} because max elevation is the same or lower. ({} instead of {})".format(job['atid'], job['max_elev'].rstrip(), other_job['max_elev'].rstrip()))
                        to_remove.append(job['atid'])

    if len(to_remove) > 0:
        # Deduplicate to_remove
        to_remove = list(set(to_remove))
        # remove items
        data = [job for job in data if not job['atid'] in to_remove]
        # generate lines for new queued_jobs file
        print("New job list with conflicts removed")
        new_lines = []
        for job in data:
            line = "{} {} {} {} {}".format(job["atid"],job["satellite_name"],job["start_time"],job["end_time"],job["max_elev"])
            print("\t{}".format(line), end="")
            new_lines.append(line)
        with open("queued_jobs", "w") as file:
            file.writelines(new_lines)
        # remove items from at queue
        for atid in to_remove:
            os.system("atrm {}".format(atid))
    print("Done.")
The logic for this script is not perfect, it is possible in certain circumstances that more satellites will be removed than should be; however, it works plenty well most of the time. Nothing like this script exists in the tutorial I based this project off of, and it is much nicer to have it (even if it isn't always perfect).
Create the systemd Unit Files
These files will be how we get the system to automatically run our scripts. First create a file in /opt/schedule_satellites/ called schedule_satellites.service and write the following:
[Unit]
Description=Schedule commands to recieve NOAA satellite images
After=multi-user.target

[Service]
WorkingDirectory=/opt/schedule_satellites

ExecStart=/opt/schedule_satellites/schedule_all.sh
That service file will simply run our schedule_all.sh script when the service is "started." Next, we will create a timer file to "start" this service every day after midnight. Create a new file in /opt/schedule_satellites/ called schedule_satellites.timer and put in it:
[Unit]
Description=Schedule NOAA satellite passes daily

[Timer]
OnCalendar=*-*-* 00:01:00
Persistent=true

[Install]
WantedBy=timers.target
You can find all the completed files needed for this project on my GitHub.
Final setup
The last thing we need to do is set up the file permissions so our scripts can execute and install our systemd unit files. To allow the scripts to be executed, run the following commands.
chmod +x /opt/schedule_satellites/schedule_all.sh
chmod +x /opt/schedule_satellites/schedule_satellite.sh
chmod +x /opt/schedule_satellites/receive_data.sh
chmod +x /opt/schedule_satellites/handle_conflicts.py
To install the systemd unit files, run the following commands.
sudo ln -s /opt/schedule_satellites/schedule_satellites.service /etc/systemd/system/
sudo ln -s /opt/schedule_satellites/schedule_satellites.timer /etc/systemd/system/
sudo systemctl daemon-reload
sudo systemctl enable schedule_satellites.timer
sudo systemctl start schedule_satellites.timer
That's finally it. I've had this setup functioning non-stop without issue for months. Your computer should now automatically start recording images from satellites starting from midnight the next night. If you want to start the process immediately, you can run the /opt/schedule_satellites/schedule_all.sh script yourself or run the following command sudo systemctl start schedule_satellites.service.
Conclusion
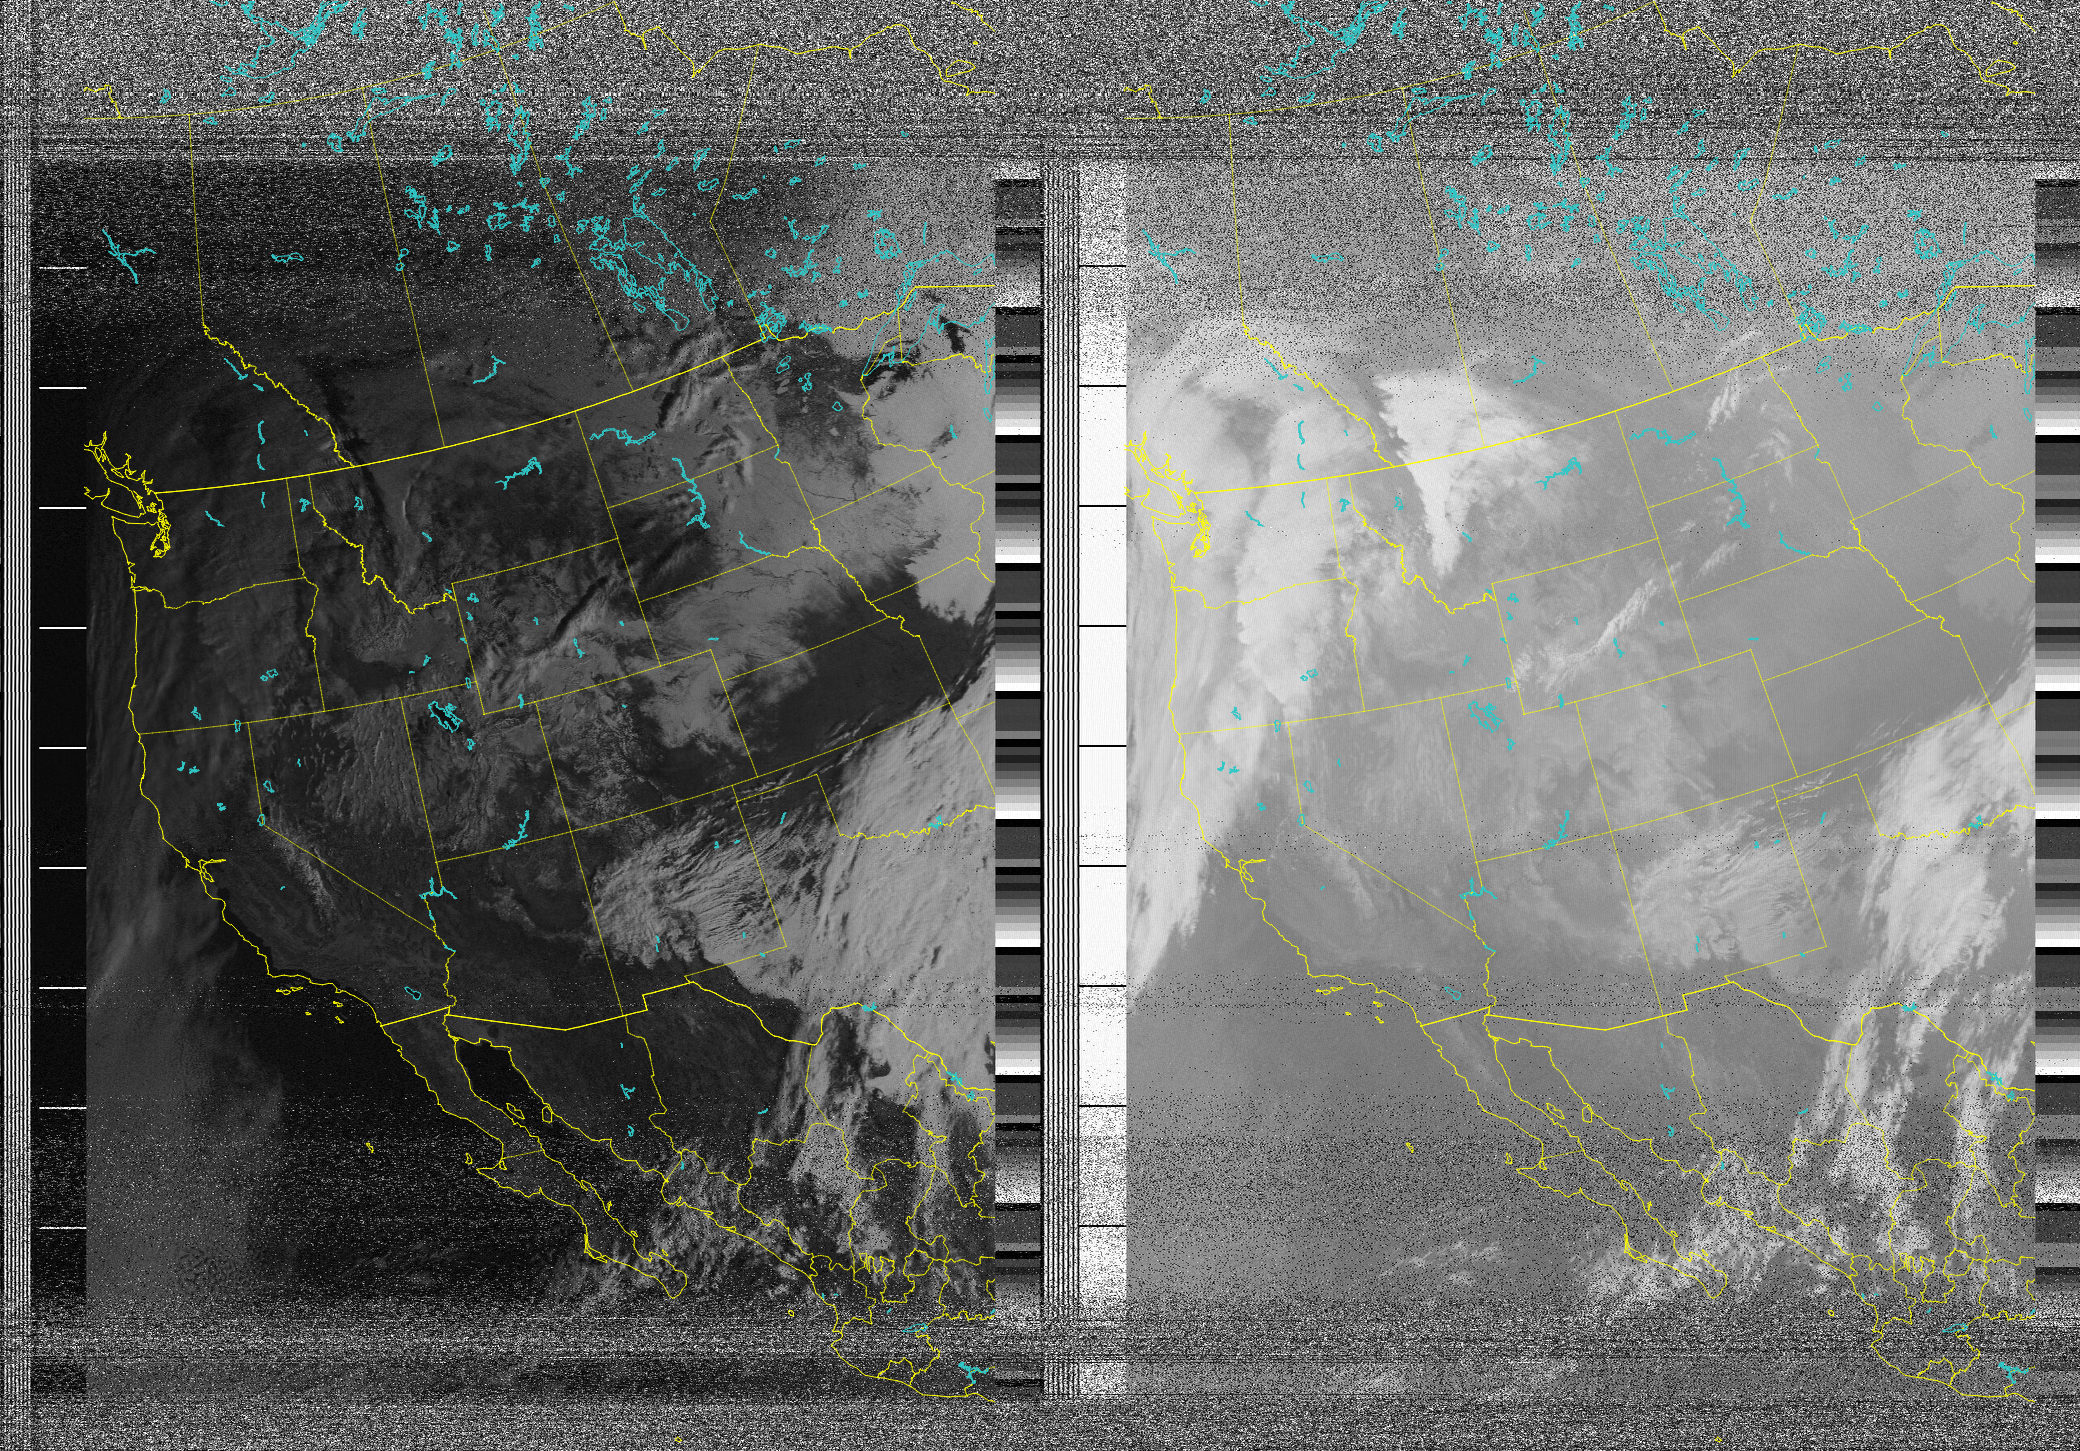
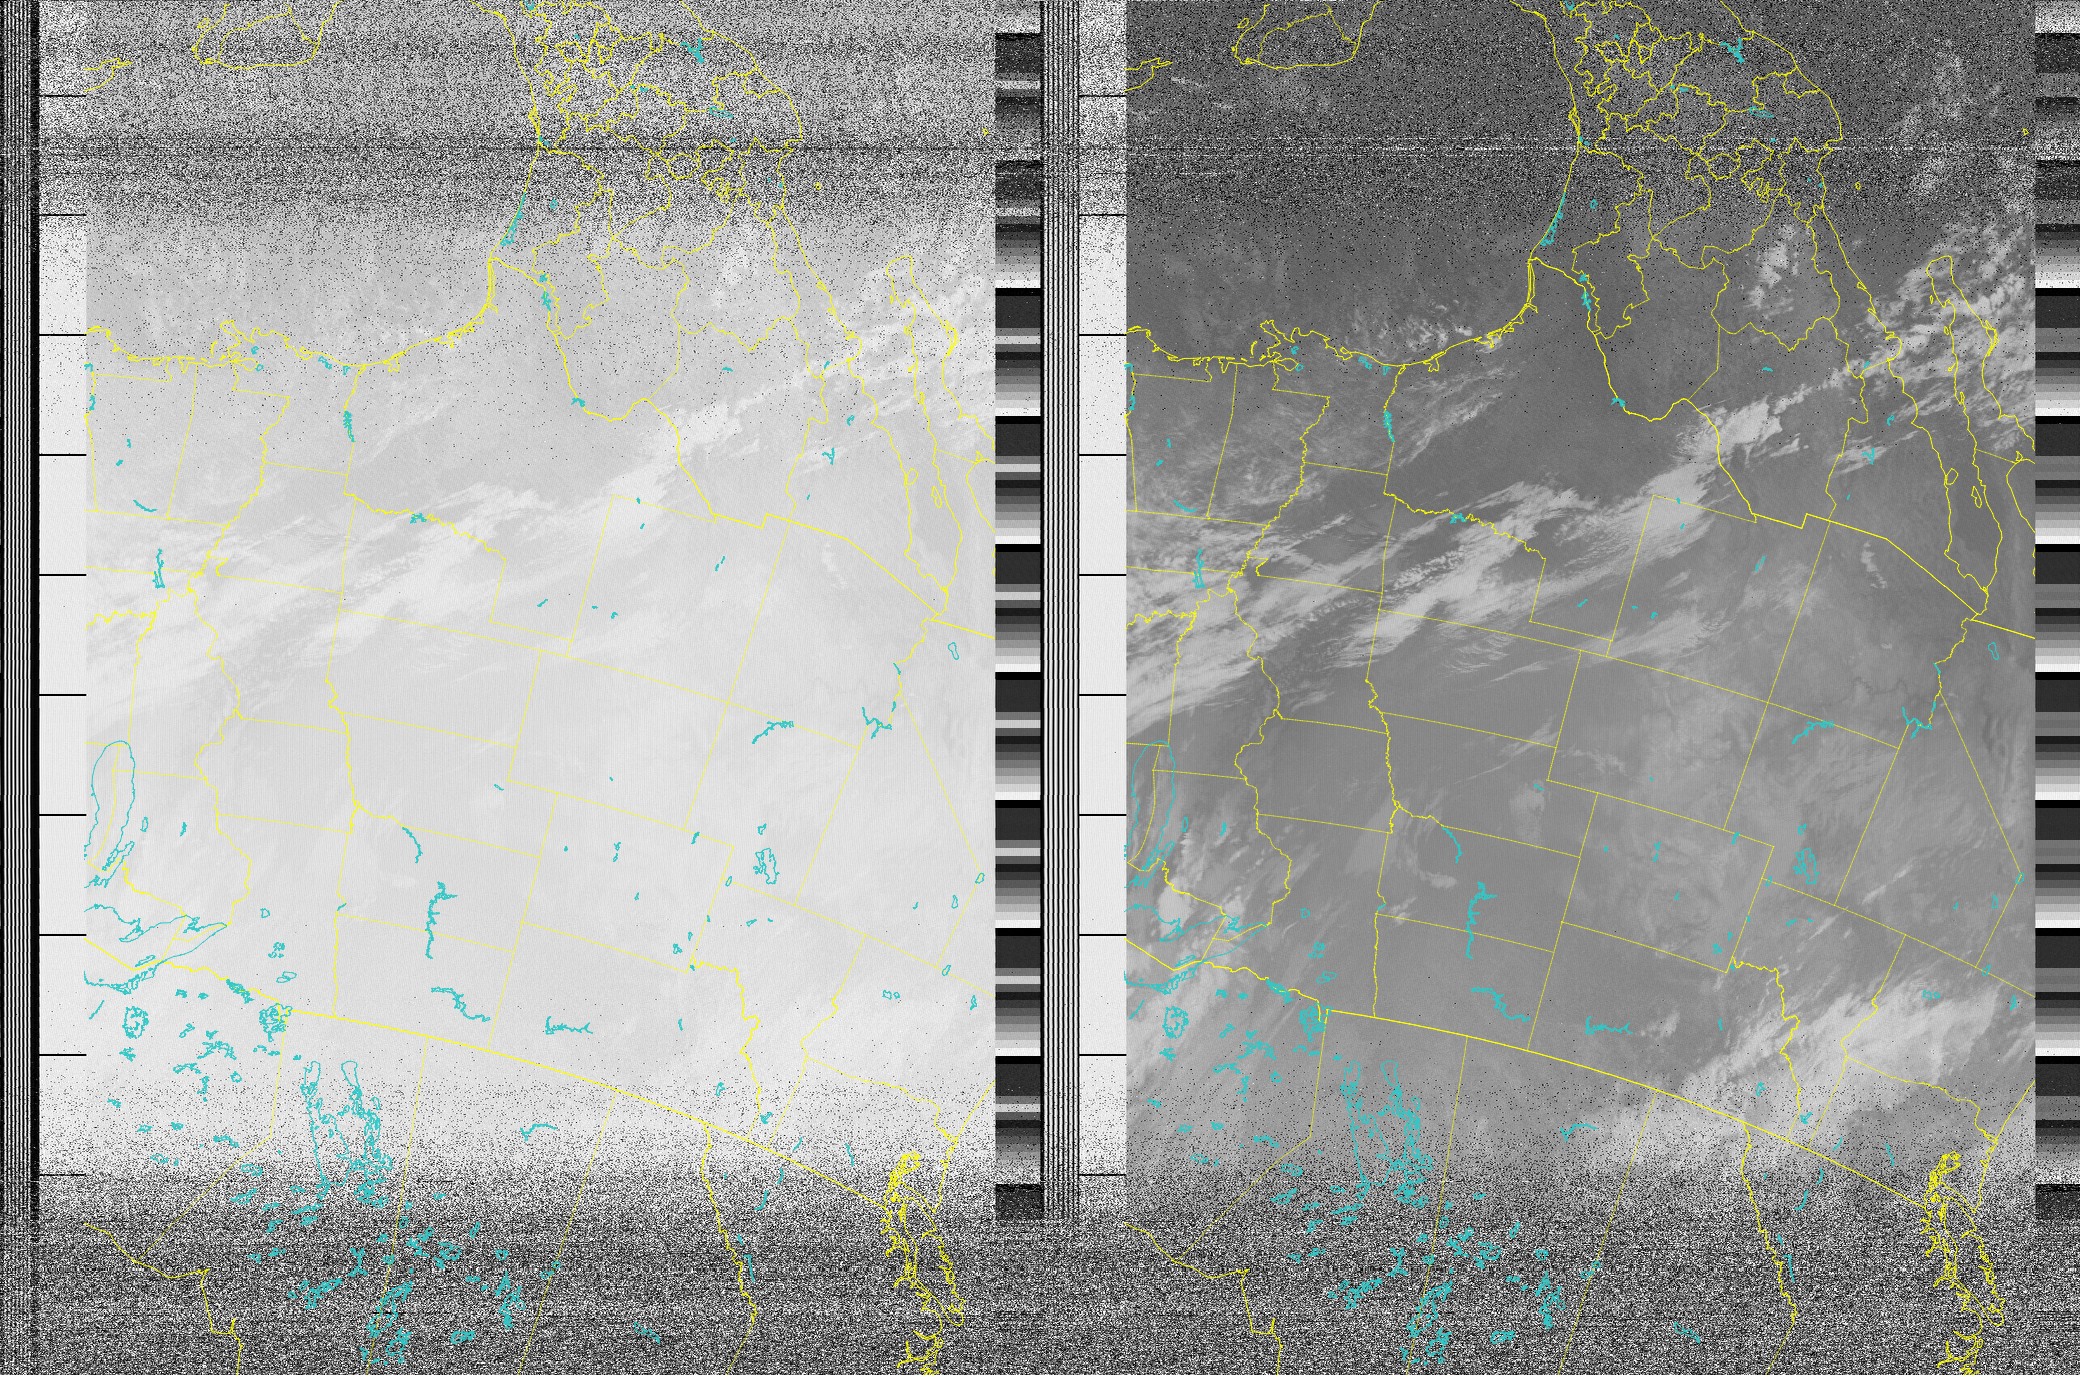
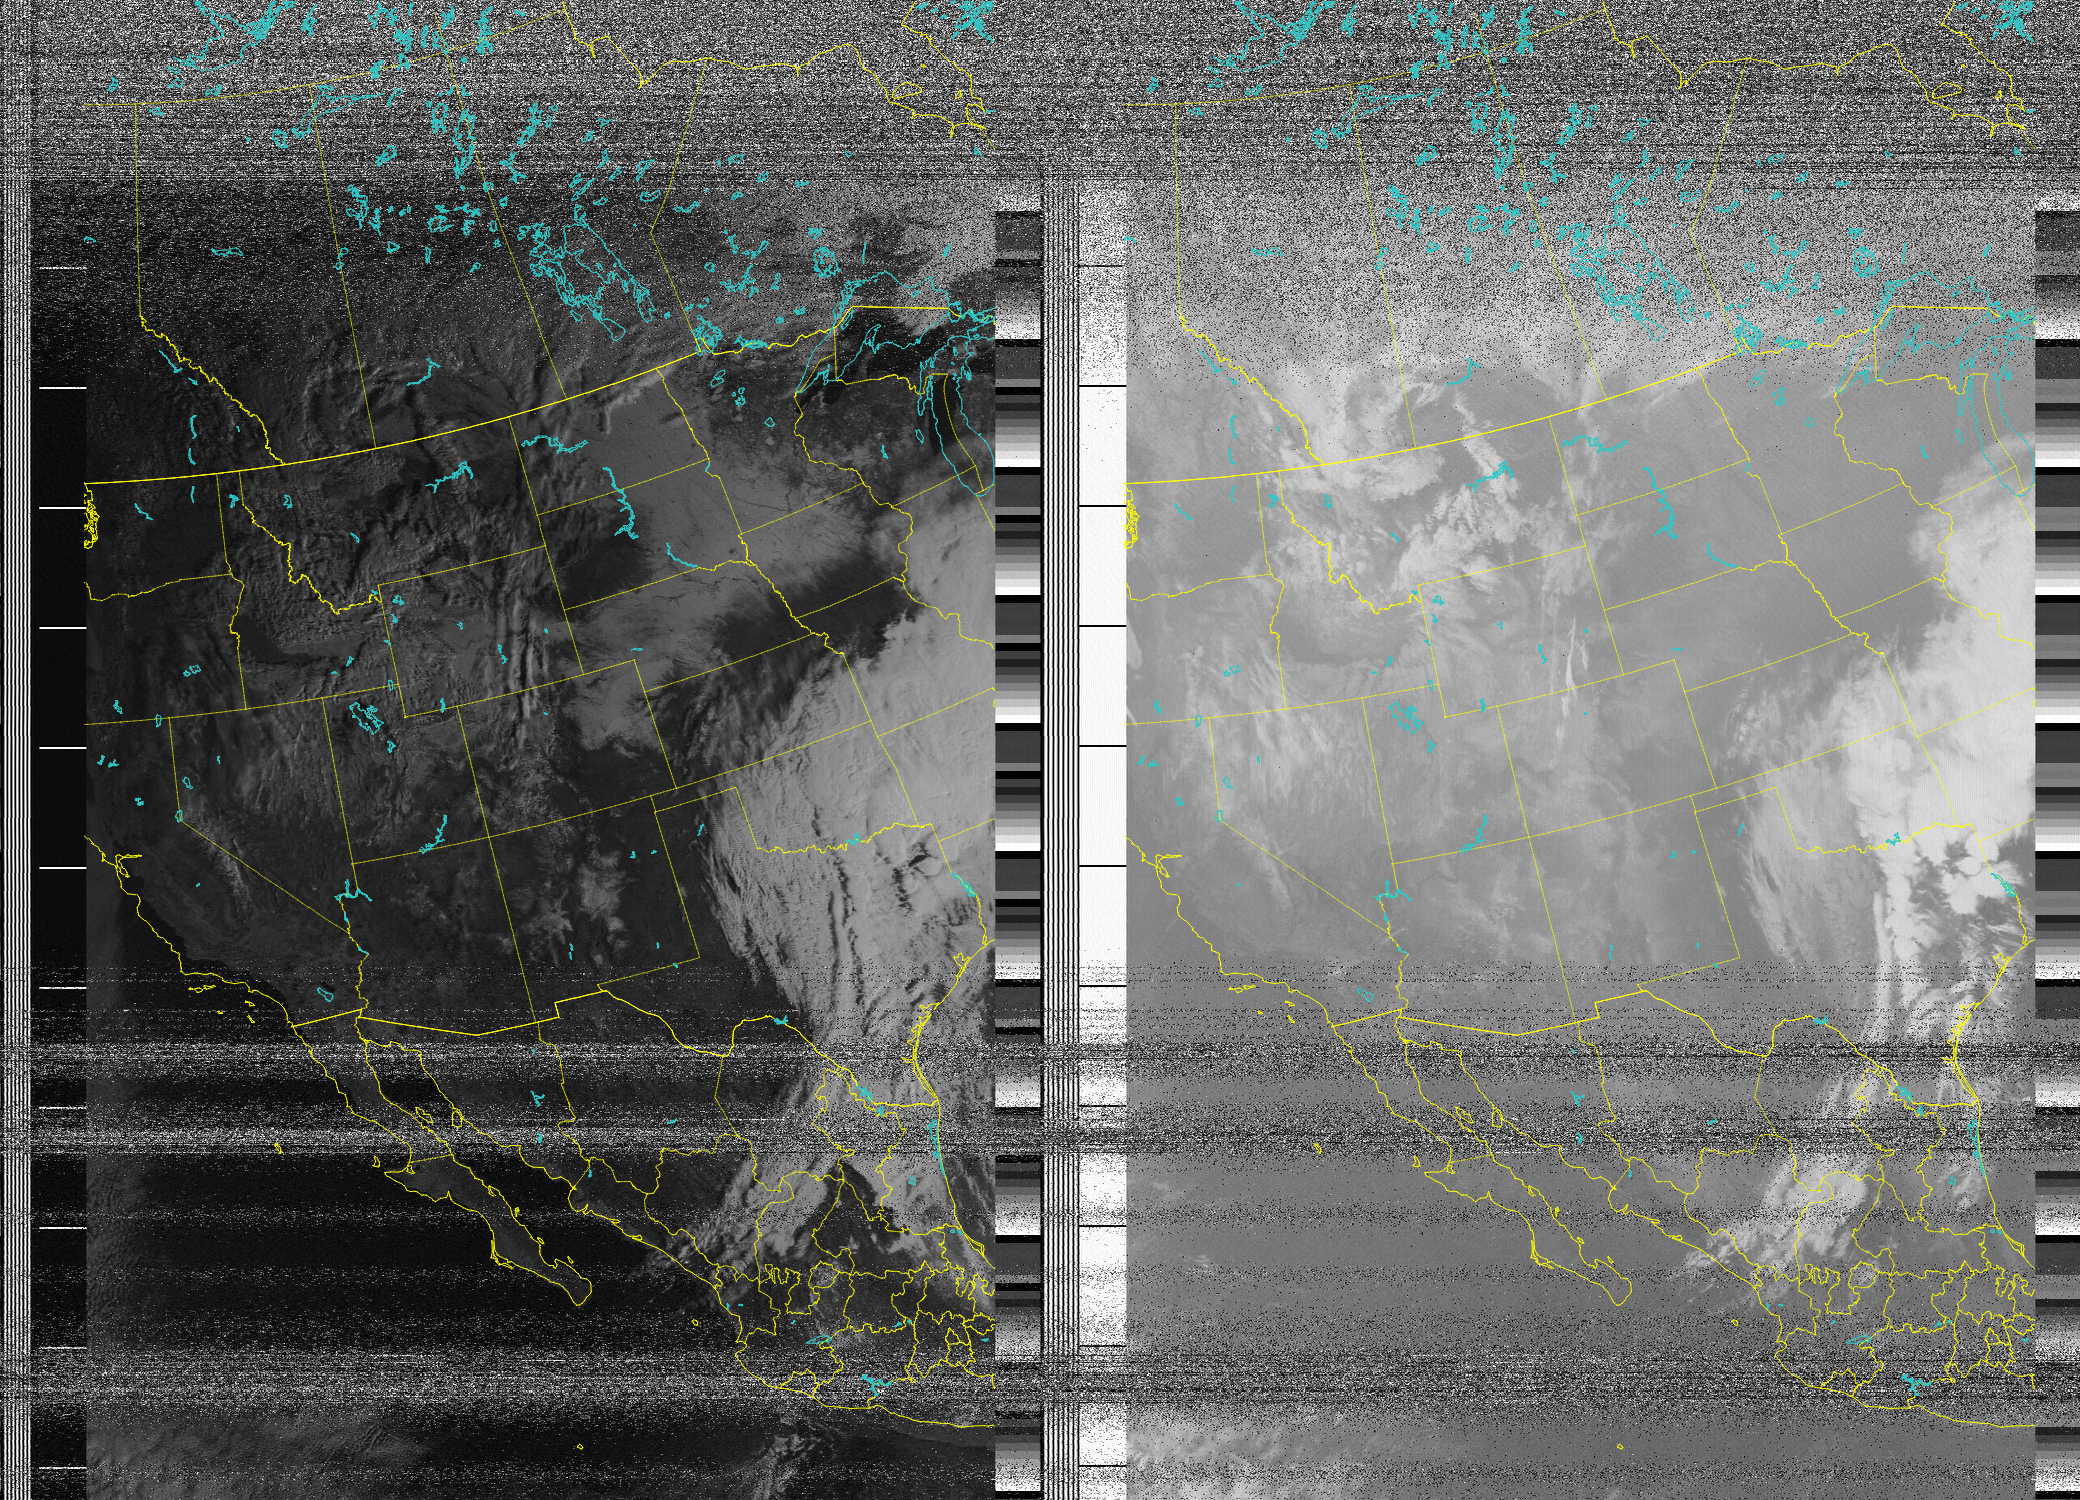
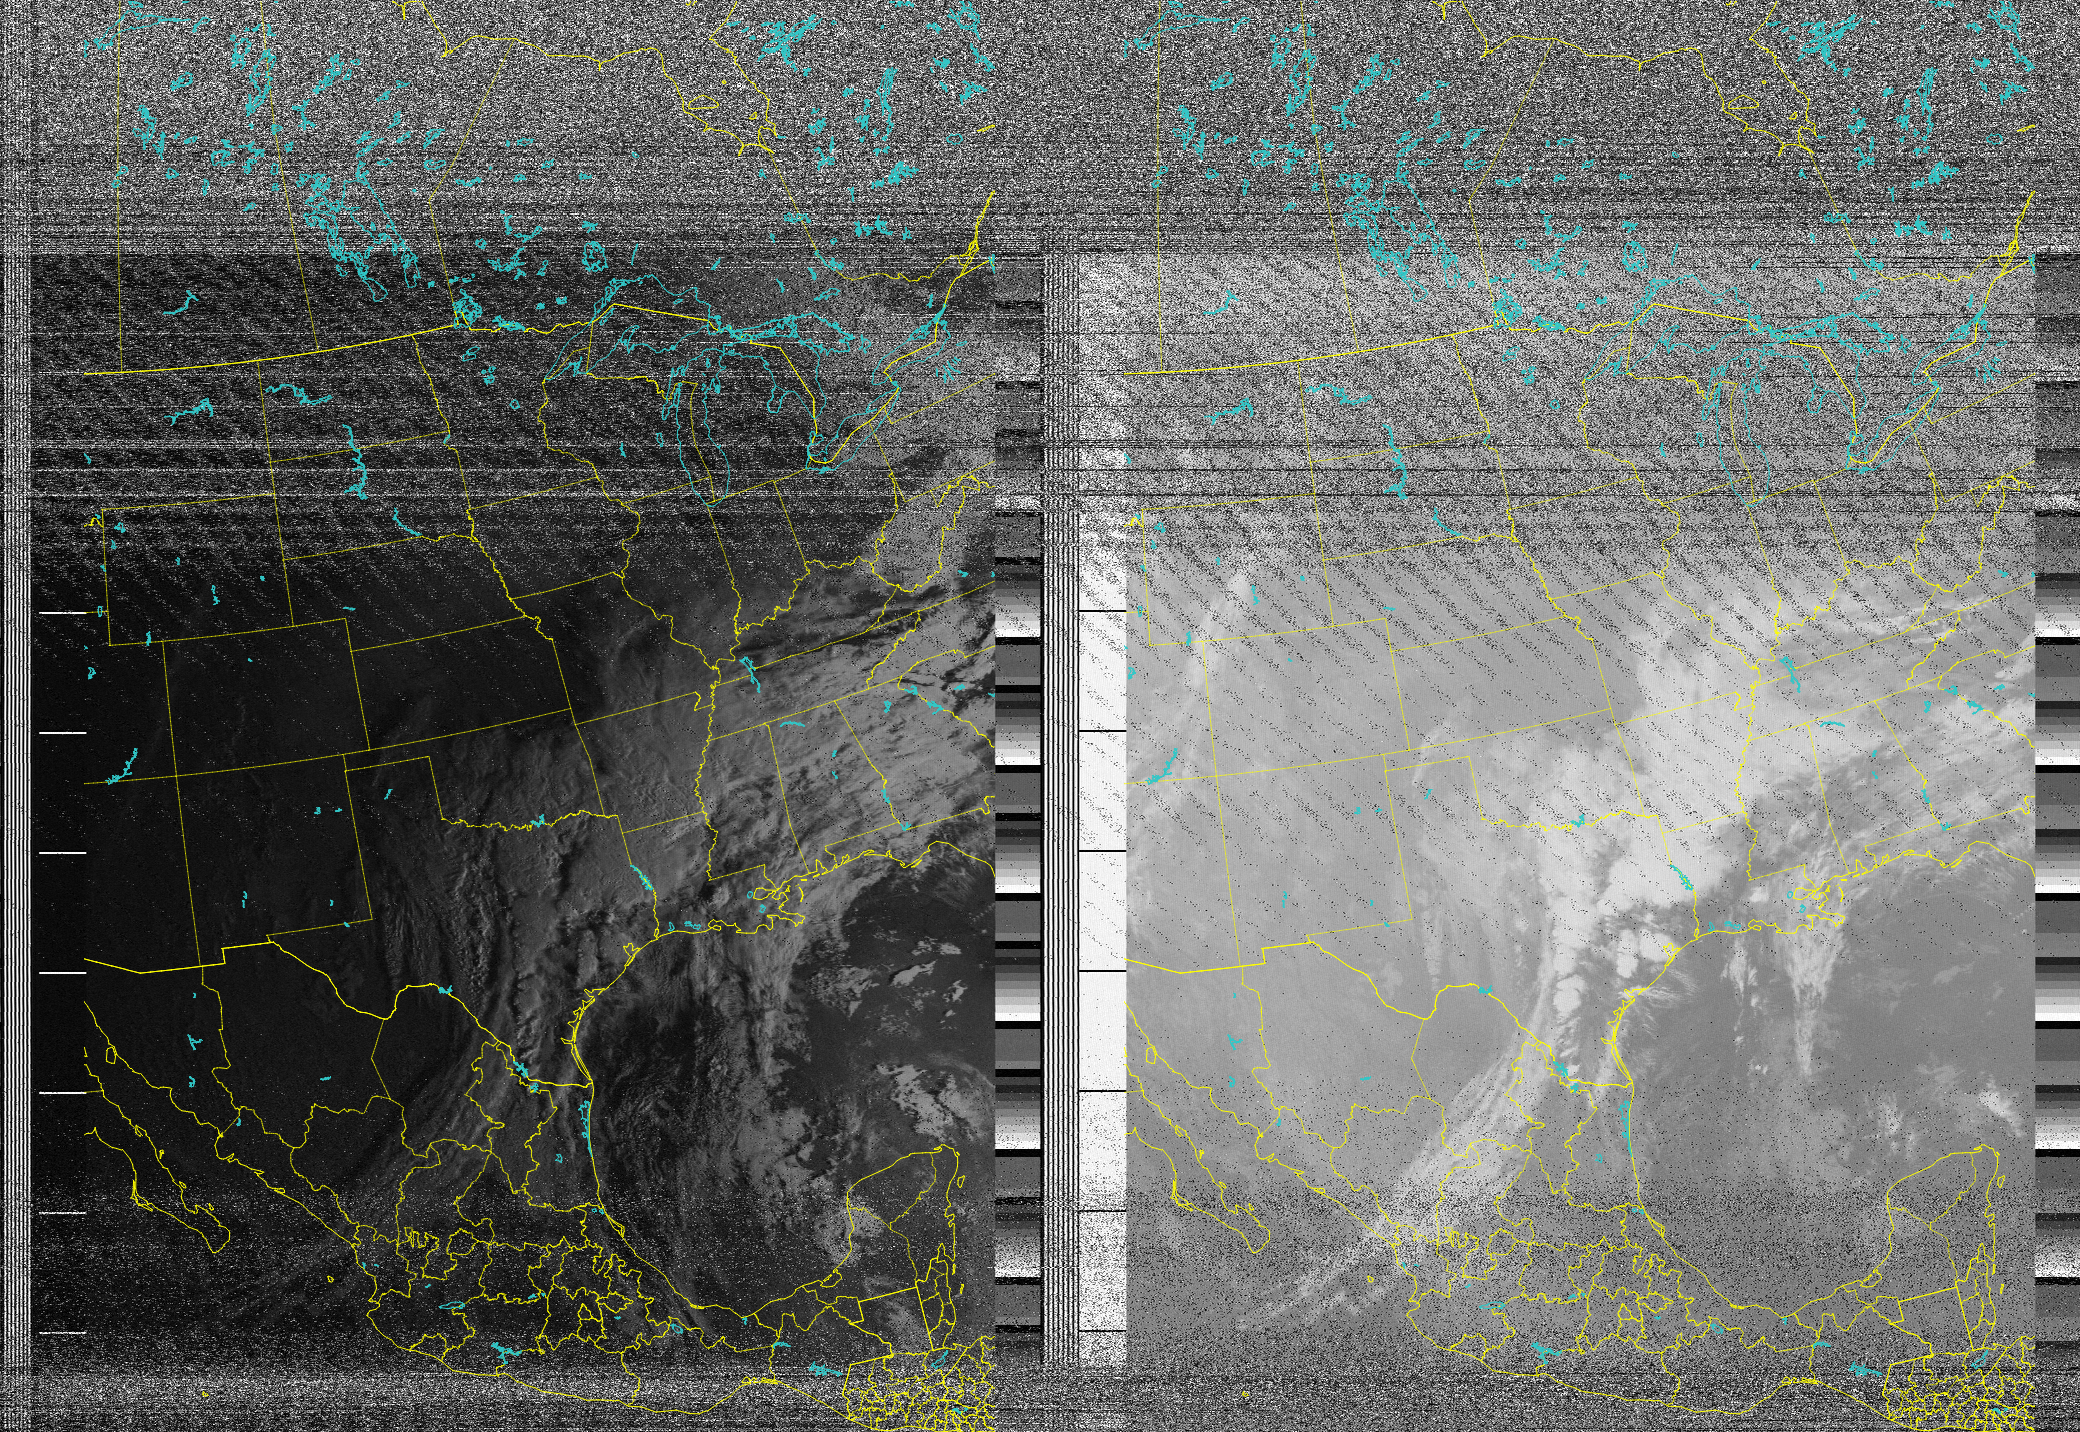
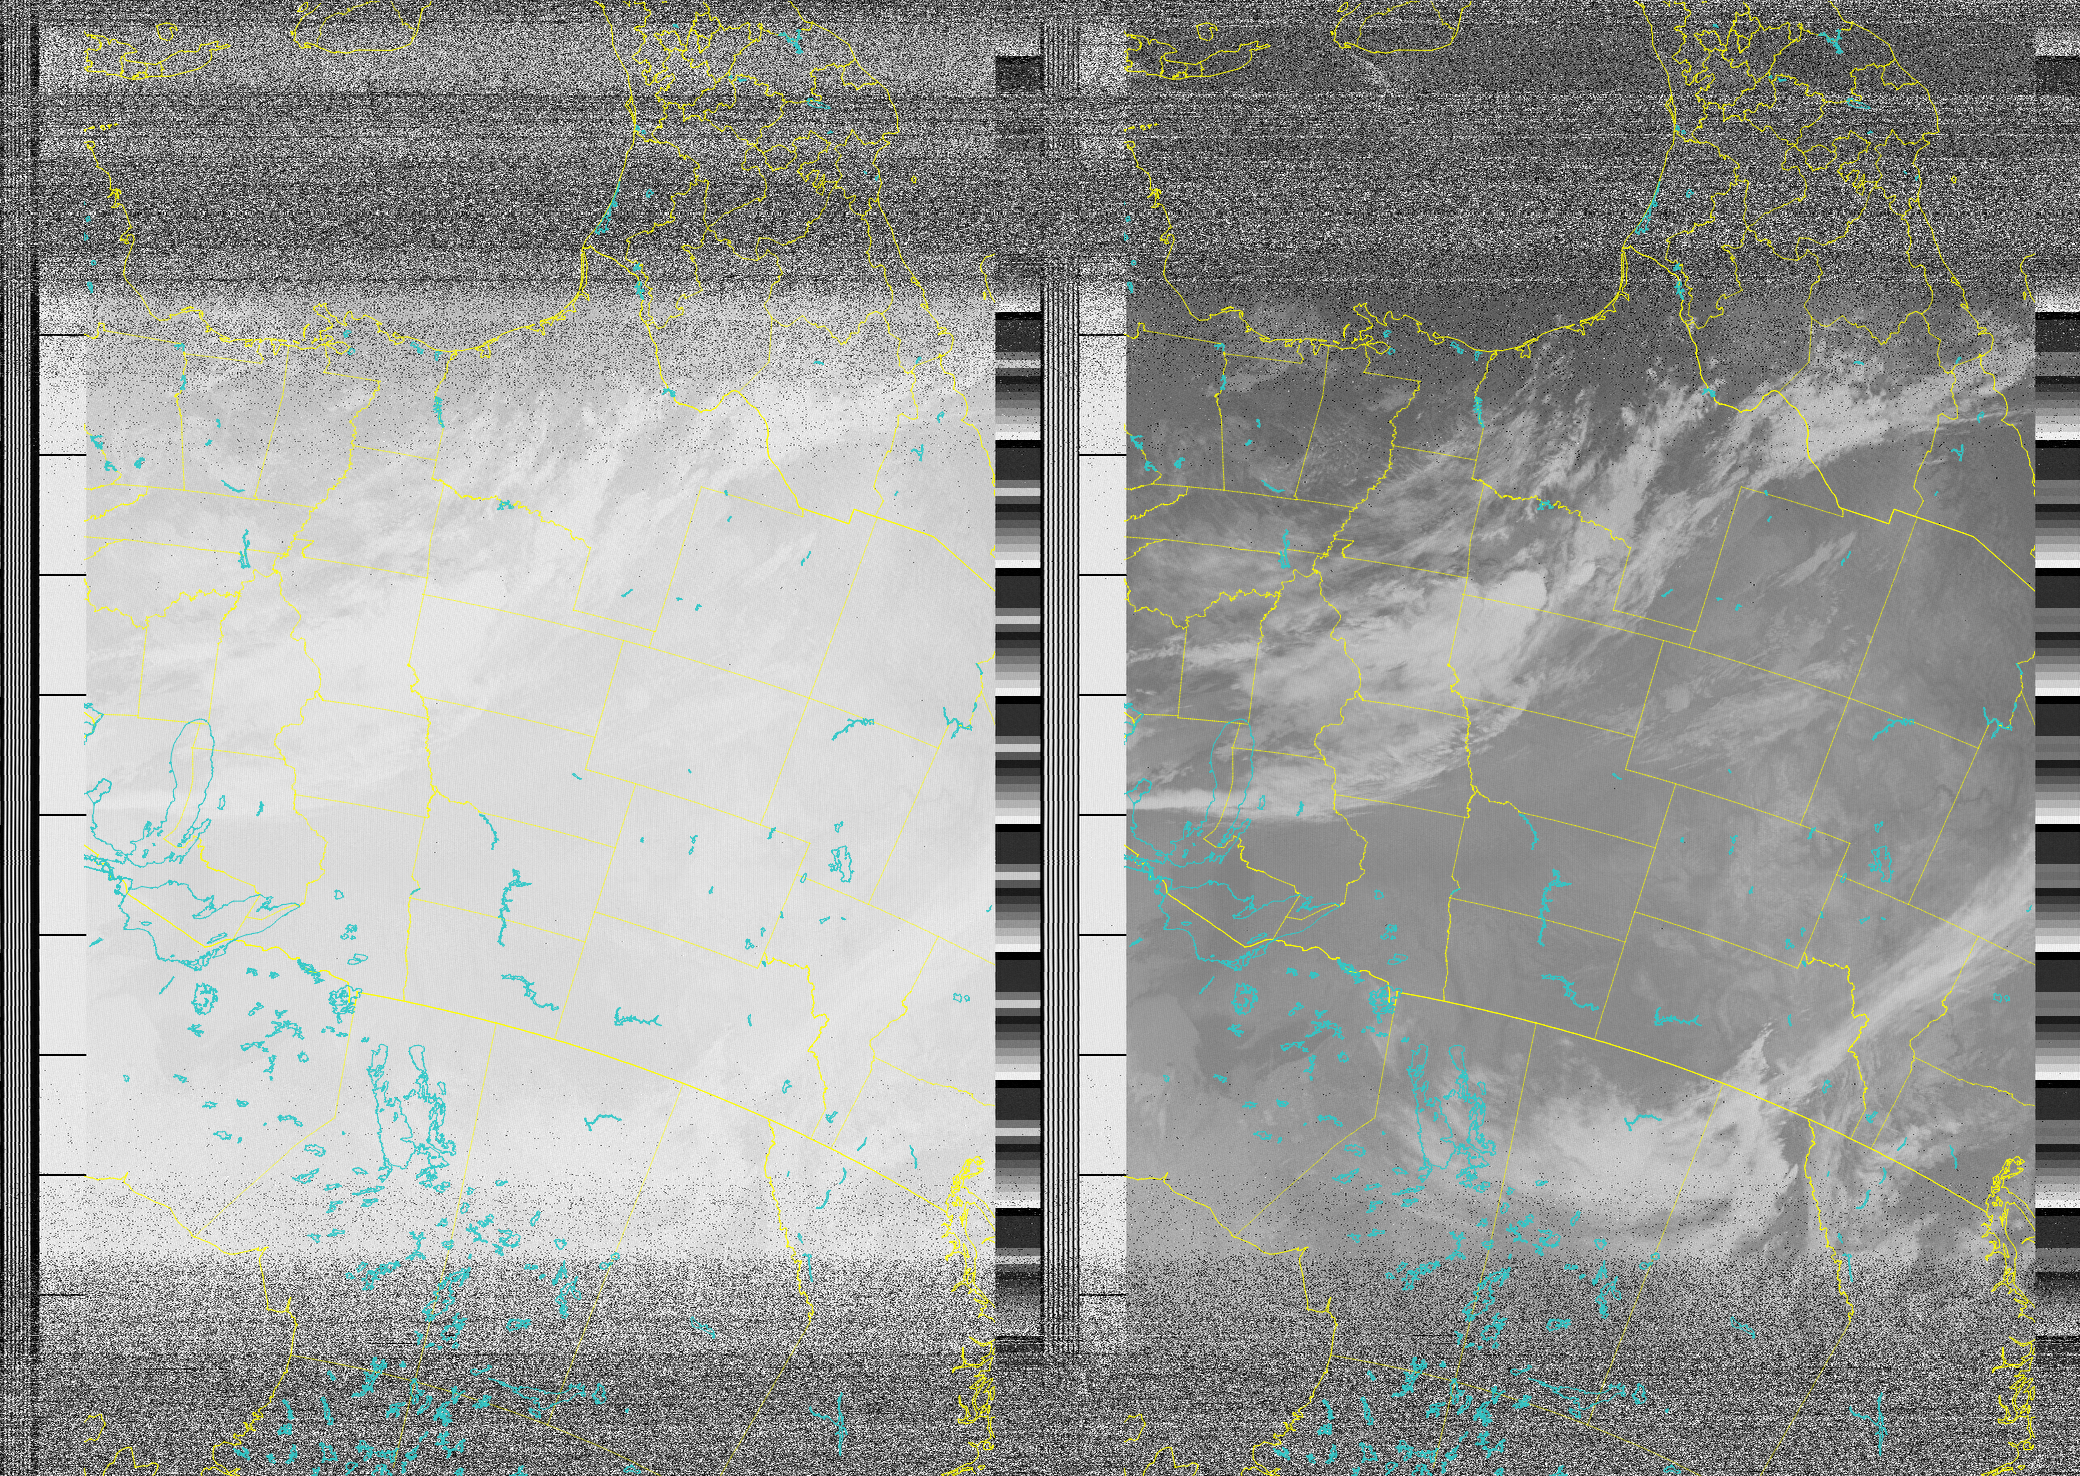
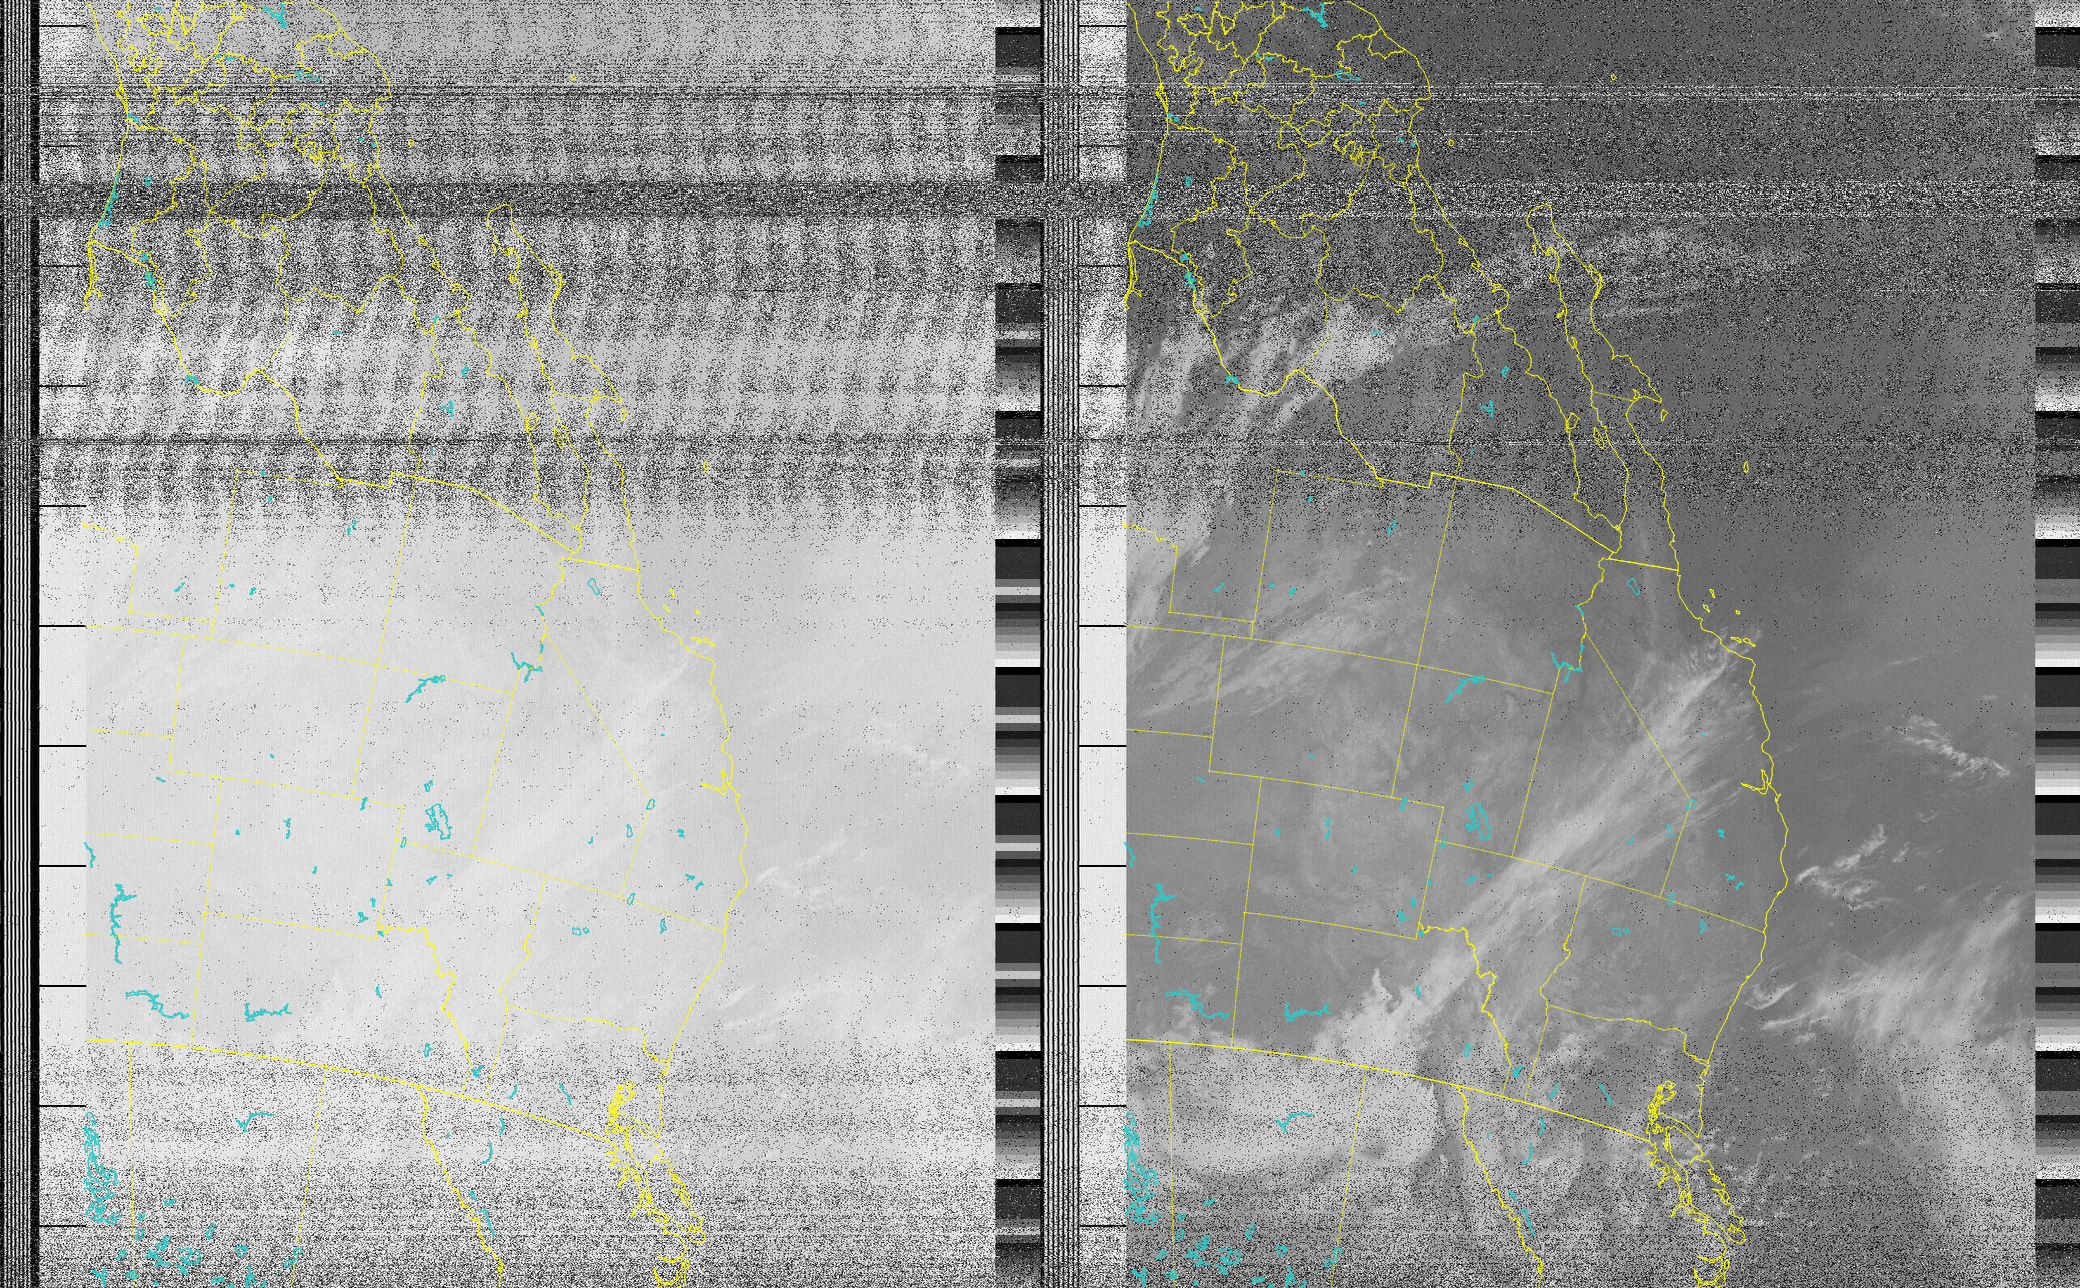
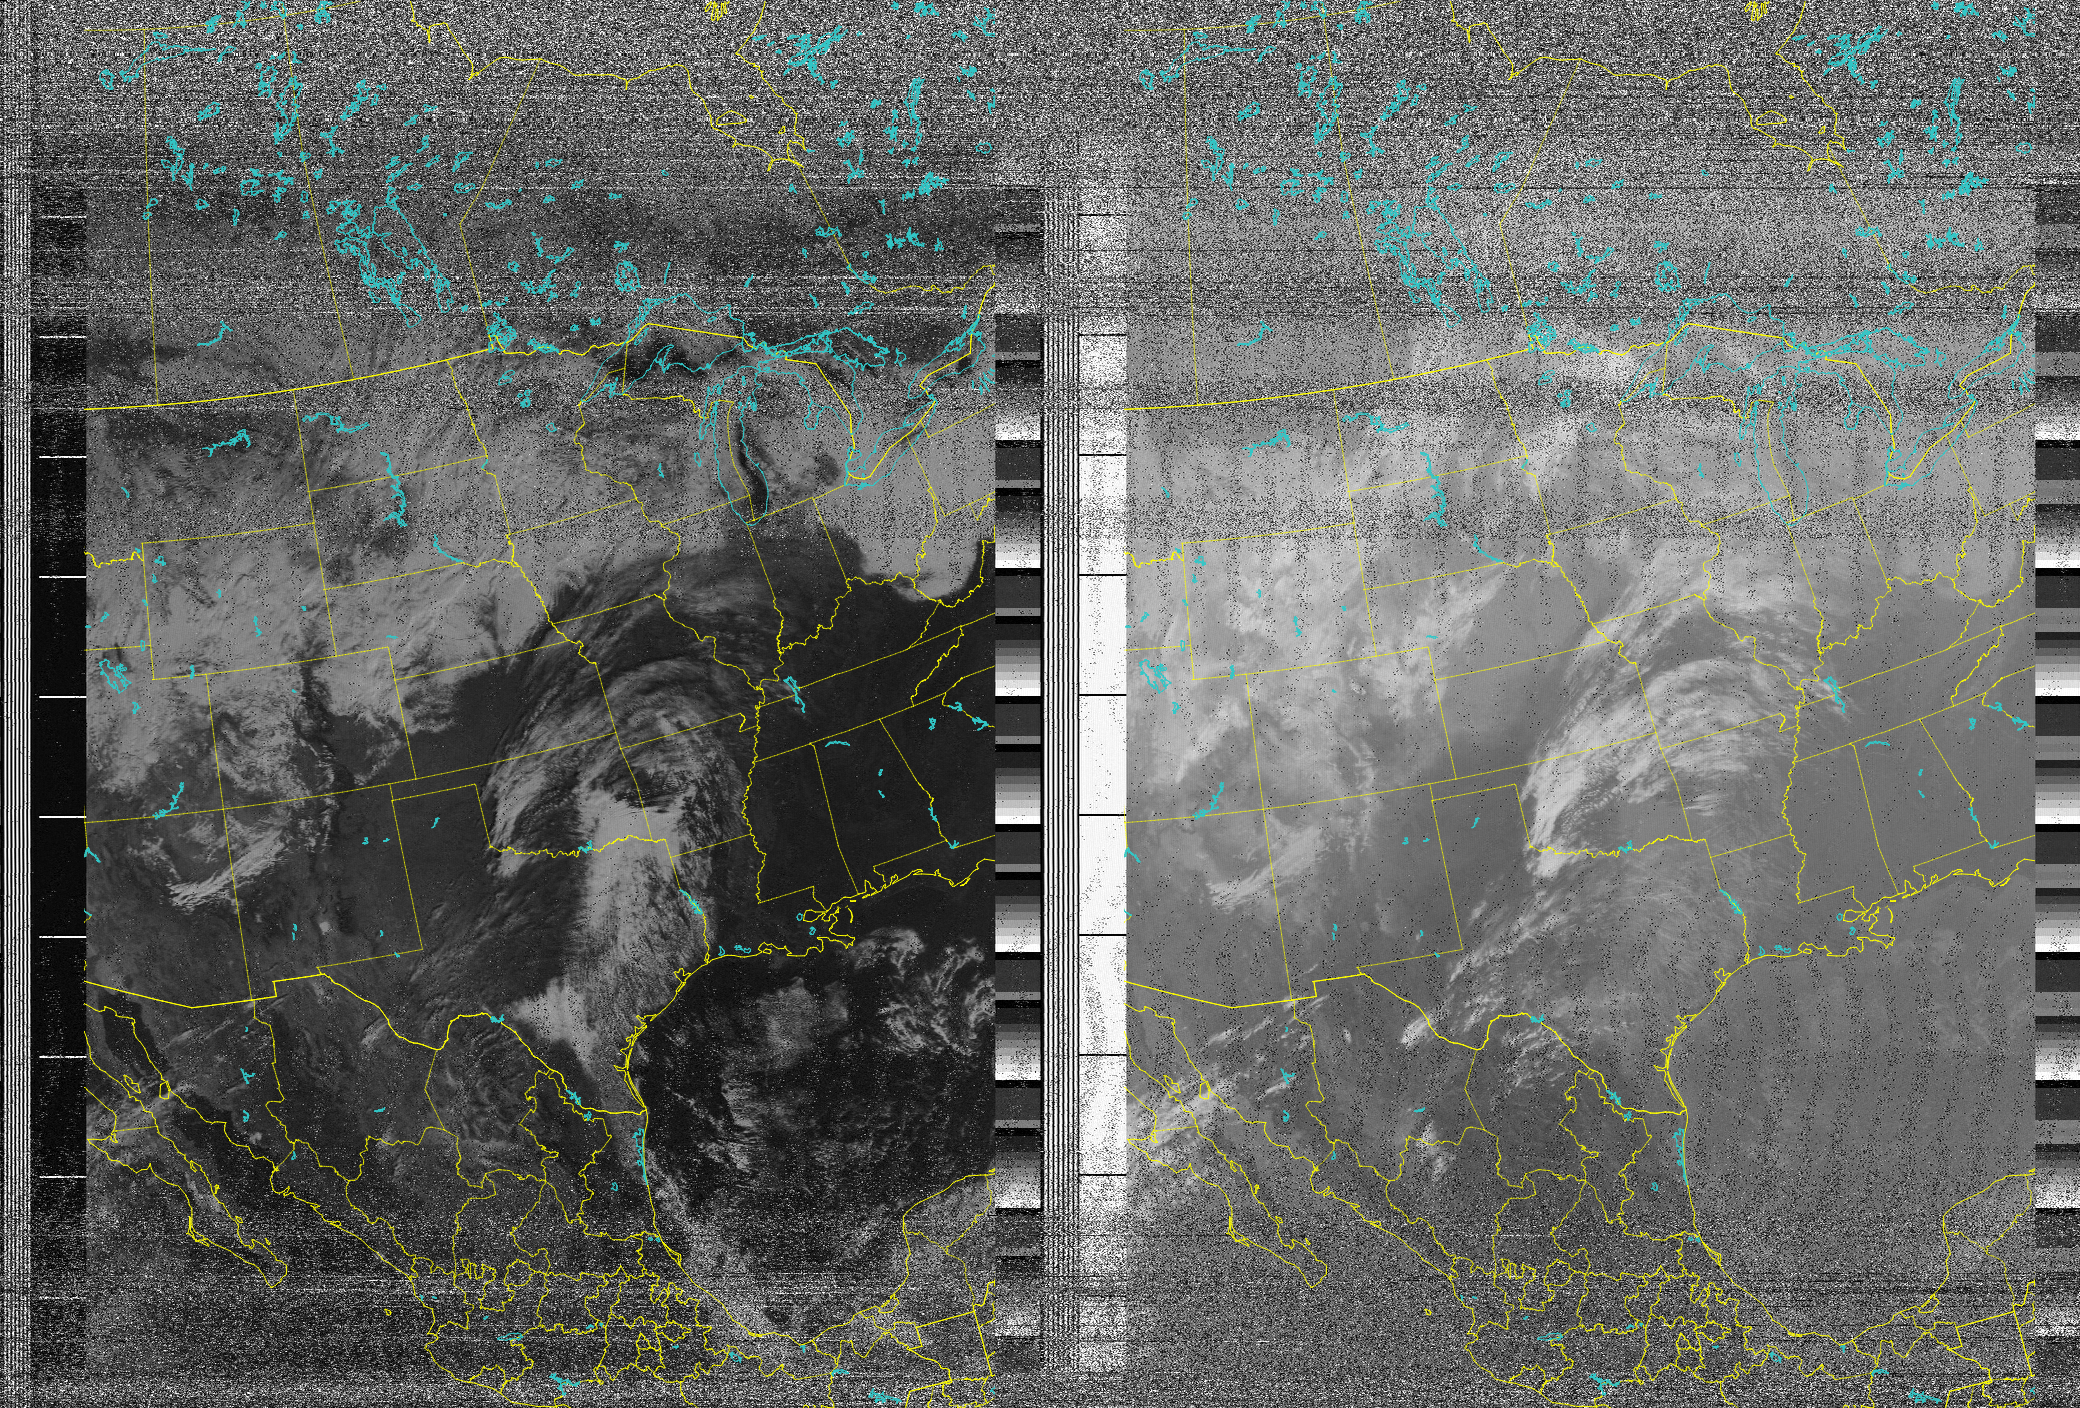
Wow, that was a lot longer than I initially expected it to be. If you managed to read through all of that, you should have learned a bit about radio, NOAA satellites, and the signals you can receive from them. You should have also learned how to set up a Linux computer from scratch to automatically capture APT images from the NOAA satellites. Here are some of the images I got. They are not all perfect, but generally kind of neat.
That's all I got for now — and boy was it a lot today. As usual, I hope you have a wonderful day and maybe check out this really peaceful music.
Edited on 2025-01-22
Reason: Fix incomplete commands for linking service and timer to systemd.
Edited on 2023-02-19
Reason: Indent code blocks for readability. Fix typo in the 'Final Setup' section.
- [bash]
- [python]
- [rtl-sdr]
- [satellite-images]
- [weather-station]
Learn about NOAA satellites, software defined radio, and automatically capturing satellite images.